Last week, we gave you some tips for Cutting Things Out the Easy Way Using the Magic Wand. This week, we’re going to show you the more advanced way.
If your image has a complex background and you are hoping to cut out a particular element of the image, you’ll want to use the Lasso tool. With this tool, you’ll be tracing around the object you want to cut out manually. A great example of this type of use is cutting out a person completely from an image and pasting their likeness into an entirely different image. This is very doable, but it requires some skill and effort. You’re going to need to take your time the first few times you tackle this process, but once you get the hang of it, it should become second nature.
Two lasso tool options
The *freehand* lasso tool can be used to draw around an area with your mouse. It can be difficult to do this with precision using a mouse. It’s much easier to do if you’re using a pen-and-tablet device (although of course most people do not use those). You may instead want to use the *polygonal* lasso tool. With the polygonal tool, click and click again and keep laying down straight lines, with Pixlr connecting your points along the way. In this way, you’ll be able to have finer control over what you’re cutting out. Your ultimate goal is to draw a point-by-point area that closes in on itself at the end — you end up where you started and have your area selected.
Make a mistake? You can add to your path by holding down the Shift key. You’ll see a small plus sign near your cursor, which means you can add to the selection with a few clicks. At this point, you can even switch to the freehand tool to carefully add to your selection. Place your pointer somewhere inside your selection and draw outside of the selection to choose the areas you want to add, ending your dragging back inside your selection at your starting point. You’ll see that your selection has expanded to include the area you drew. This is great for capturing detail that may have been hard to capture with your first pass. You may even want to zoom in to do this kind of detail work.
Similarly, you can remove part of your path by holding down the Alt or Option key. You’ll see a minus sign, and you can remove areas in much the same way by drawing inside and outside of the selection area. Again, I recommend using the freehand tool to do this kind of work. And again, draw your path and end up where you started, and you’ll see that area has now been removed from the selection area.
![]()
Step by step with the polygonal lasso tool
- Select the lasso tool from the toolbar. Check your tool options and make sure you have selected the polygonal lasso tool if that is what you are planning to use.
- Click on a starting point in your image. Move your mouse along the path that you want to draw. Keep clicking as you go to keep laying down the path, drawing your way carefully around the object you will be cutting out.
- Once you have drawn around the area you want to cut out and reach your starting point, click on that starting point. Pixlr will outline the area you’ve selected with flashing dotted lines.
- Copy your selection. At this point, you may want to paste your selection into a blank canvas or into another image that you have waiting. Alternately, you can “invert selection” which will choose the area around your path. In this way, you can cut out the background if you choose.
An example to get you started
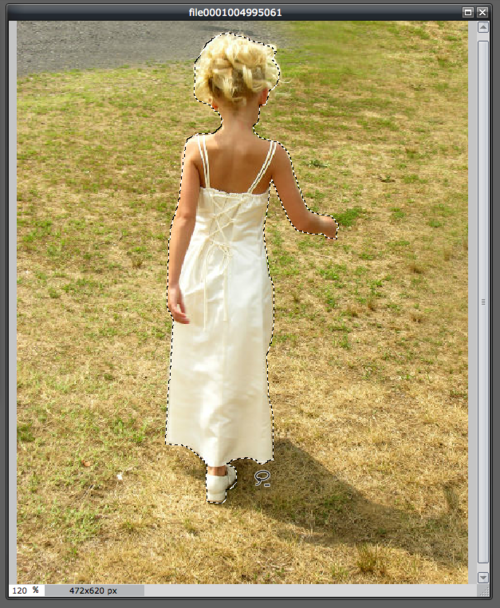
As a simple demonstration, let’s cut out this girl walking through the grass at an outdoor wedding and transport her to a wide open road.

I start by choosing the polygonal lasso tool and then work deliberately from point to point, starting at the base of her shoe. I draw up the left side and back down around to the shoe again.

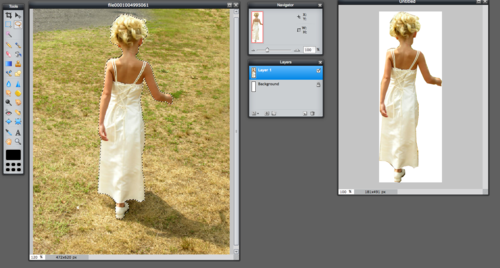
Once I’m back where I started, I see that the area is selected, at which point I copy it to my clipboard.
Here I’ve also pasted it into a new document to show you what that looks like.
But my real goal is to add her to this file of a deserted highway, so I open up that image and paste the selection in.

I bumped up the contrast of her layer and used the burn tool to add a little bit of shadow in there after pasting her in. I could do more to clean this up and make it look a little more professional, but it’s fine for my purposes. You may want to more clean-up with your projects, but as always it depends on your goals and level of skill with some of the more advanced tools.
A few extra tips
- Feathering: If you want the “cuts” you’re making to have a very hard outline, turn feathering off completely. If you want a soft, gradual edge, increase the feathering amount. The more you increase the feathering, the more blurred your edges will be. If you’re using very high feathering, your cut-out may take on a “halo” like appearance.
- Anti-alias: Choosing the anti-alias option will smooth the jagged edges of your cut-out. Think of anti-aliasing as a piece of fine sandpaper that smooths out the pixels where you’re cutting.
- Invert selection: If you’ve drawn a path around your object but want to delete everything outside of your closed path, use the “invert selection” command in the Edit menu to choose the area outside.
- Check your contrast: Once the image you’ve cut out has no background around it, it can sometimes look less vibrant. Try increasing the contrast and see how it looks.