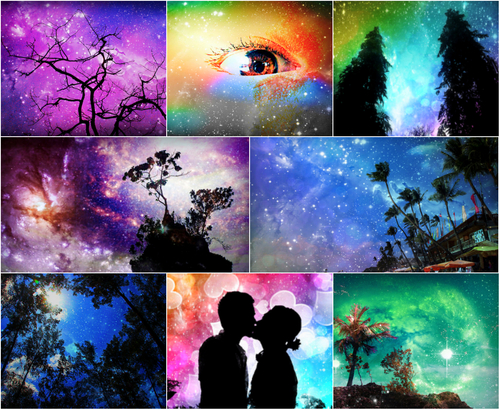
We’re big fans of what we like to call space silhouettes. These types of photos use the space overlays in Pixlr Express to create some very beautiful images. We’re going to spotlight some of the best space silhouettes out there in an upcoming post, so please join us in making one and sharing it with us. If you’ve never made one before, this tutorial will get you there in no time.
Aldrin Gersalia is a master at this kind of editing treatment. He’s a Pixlr superuser who participates a lot in the Pixlr on Flickr group. (He’s Prisbourne on Flickr). We asked him to make one for us so we can see exactly how he makes it. To make it even easier for you to make one yourself, we also asked him to record his workflow, which we turned into a video:
https://vimeo.com/102572774
Want to make your own? There are lots of variations on this technique, but this is the way to create the strongest space silhouette. Here’s how to do it step-by-step using Pixlr Express for the web:
Step 1: Edit your photo
Autofix. Sharpen. Bump up the contrast. These are a few things you might do with a photo that has a strong silhouette. For this technique, do the kind of editing you would normally do, but don’t be afraid to do it in a bold way. Of course, you will want to start with a photo that is either a silhouette or perhaps even one that is underexposed a bit. One with a big sky will work best.
Step 2: Add Color & Texture
You want to lay down the color that will sit underneath your spacey sky. Some of the Bokeh effects have some strong colors, but you can also change the hue of your image or apply one of the color correction filters. Anything to put some serious color and maybe even texture in that sky. After you do that, use the History Brush to remove the effect you added in the area where your main subject sits. This technique is all about layering in effects, and the History Brush will let you remove any effect you’ve added in specific locations.
Step 3: Add a Space Overlay
Choose a space effect that you like. Some work best with light images, some work best with dark images. Use the randomizer to quickly cycle through space overlays until you find one that works. Rotate it if necessary to work with your subject. Once you’ve chosen one, use the History Brush to paint out the subject just as you did in the last step.
Step 4: Add a Second Space Overlay
Make it twice as nice by adding a second, different space overlay. This is one of the real secret’s to Aldrin’s technique. He makes the spacey sky extra strong by doubling down on the space effect. Paint out the subject with the History Brush.
Step 5: Tweaks
After this, you are essentially done, but you may want to try bumping up the saturation or vibrance or otherwise tweak the color in your sky to make it stand out even more. Or, add some vignetting or a border if you think that will complete the image.
Step 6: Show It to Us!
This is obviously an optional step, but it’s one we hope you’ll consider. We love these kinds of space silhouettes and want to put together a gallery of them if possible. But we need you to point us to them. Shoot us a tweet at @pixlr on Twitter or pop it into the Pixlr on Flickr group so we can collect our favorites for an upcoming post.
Last Update:
November 12, 2013